This article describes how to reduce the size of disk in VMware
Sometimes extending the space more than as required space. This scenarios, you can reduce the space on disk level.
Prerequisites :-
> Delete the snapshots if VM having.
> Shut down the VM.
> Take a full backup of VM by using backup tools if have it.
How to reduce the disk size on OS level:-
> Login OS by using RDP.
> Press (windows+ R) RUN and type diskmgmt.msc
> It will redirect to disk managment console.
> There, click properties on required disk and shrink the space how much we want.
> You will get unallocated space which shrinked space.
Next You should perform on VMware side:-
> Go to edit settings of VM and collect the information of disk location (like datastore path)
> Then, Login esxi host by using putty.
> Go to path ( # cd vmfs/volumes/datastorepath/VMpath/)
> Identify which disk you want to reduce the space.
> edit (vi migration-TestV.vmdk)
> Press I for update the changes.
> You should make changes RW value which is highlighted yellow colour.
Formula (size of disk X 1024 X 1024 X 1024 % 512 = total values)
> So you want to reduce space 2 GB out of 9 GB.
> exact value now (9-2= 7)
> 7 X 1024 X 1024 X 1024 % 512 = 14680064
> 14680064 this number updated into vmdk description file.
> Saving the file (press ESC and :wq!)
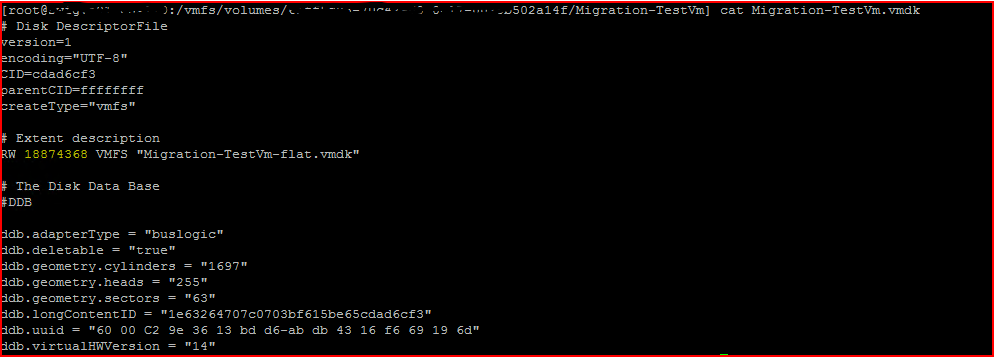
> After saving the file, verify the values of disk by using # cat migration-TestV.vmdk
Now to update the values on vCenter side, either perform storage migrtion or clone the disk
Perform storage migration:-
> Right click of VM and choose storage migration.
> Verify the disk size on vCenter after migration.
Clone the disk :-
Sometimes, we can't perform storage migration due to esxi host standalone host or no space on other datastore.
> Login esxi host by using putty.
> Go to path ( # cd vmfs/volumes/datastorepath/VMpath/)
> Run the command
> # vmkfstools -i migration-testvm.vmdk data-testvm.vmdk
> Remove the old disk " migration-testvm.vmdk"
> Attach new disk in vCenter.
Please find the below step by step each screenshots.
> Login OS by using RDP.
> Press (windows+ R) RUN and type diskmgmt.msc
> It will redirect to disk managements console.
> Press (windows+ R) RUN and type diskmgmt.msc
> It will redirect to disk managements console.

> There, click properties on required disk and shrink the space how much we want.


> Login esxi host by using putty.
> Go to path ( # cd vmfs/volumes/datastorepath/VMpath/)
> Identify which disk you want to reduce the space.
> Go to path ( # cd vmfs/volumes/datastorepath/VMpath/)
> Identify which disk you want to reduce the space.

> Identify which disk you want to reduce the space.
> edit (vi migration-TestV.vmdk)
> Press I for update the changes.
> You should make changes RW value which is highlighted yellow colour.
Formula (size of disk X 1024 X 1024 X 1024 % 512 = total values)
> So you want to reduce space 2 GB out of 9 GB.
> exact value now (9-2= 7)
> 7 X 1024 X 1024 X 1024 % 512 = 14680064
> 14680064 this number updated into vmdk description file.
> Saving the file (press ESC and :wq!)


> Perform the storage migration to display size on vCenter side.
Clone the disk :-
Sometimes, we can't perform storage migration due to esxi host standalone host or no space on other datastore.
> Login esxi host by using putty.
> Go to path ( # cd vmfs/volumes/datastorepath/VMpath/)
> Run the command
> # vmkfstools -i migration-testvm.vmdk data-testvm.vmdk
> Remove the old disk " migration-testvm.vmdk"
> Attach new disk in vCenter.


> Verify the disk size of VM in vCenter after perform the clone or storage migration.

Shrinking VMDK Virtual Disk Size on VMWare ESXi
 Reviewed by Virtulization
on
November 22, 2023
Rating:
Reviewed by Virtulization
on
November 22, 2023
Rating:
Reviewed by Virtulization
on
November 22, 2023
Rating:


No comments: